
 Netty网络通信
# 概述
Netty是 NIO客户端服务器连接的框架 , 能够进行简单开发网络通信应用程序 , 只要有 服务器 连接至 客户端 就可称之为 IO 通信 ,
Netty测试需要JDK版本 1.8以上
Java中IO程序分类 :
官方API : https://netty.io/4.1/api/index.html (opens new window)
B站视频 : https://www.bilibili.com/... (opens new window)
第三方文档 : https://www.w3cschool.cn/netty_4_user_guide/sw1v6ozt.html
# 入门应用
# BIO
采用JavaSE库中的 Socket类 (套接字) , 了解可以看会我以前笔记 点击跳转
简单应用
通过 Java 运行的服务端 和 cmd telnet指令 通信
Java服务端代码
展开 SocketServer类
public class SocketServer {

    public static void main(String[] args) throws IOException {
        // 监听本机端口
        ServerSocket serverSocket = new ServerSocket(9099);
        while (true) {
            // 阻塞等待 客户端 连接
            System.out.println("等待连接...");
            Socket clientSocket = serverSocket.accept();
            System.out.println("有客户连接了...");
            handler(clientSocket);
        }
    }

    /**
     * 接收消息
     * @param clientSocket 客户套接字
     */
    private static void handler(Socket clientSocket) throws IOException {
        byte[] bs = new byte[1024];
        int read = clientSocket.getInputStream().read(bs);
        System.out.println("read 完成..");
        if (read != 1) {
            System.out.println("收到数据: " + new String(bs, 0, read));
        }
    }

}
cmd 进入 , 执行 telent命令
# 连接 本机:9099
telent localhost 9099
# 更改模式 Ctrl+]
send {内容}
# 关闭连接
quit
cmd食用 telent命令 , 需要启动Windows功能
控制面板 -> 程序 -> Windows功能 -> 启动Telnet
断点测试观察 代码块高亮阻塞点
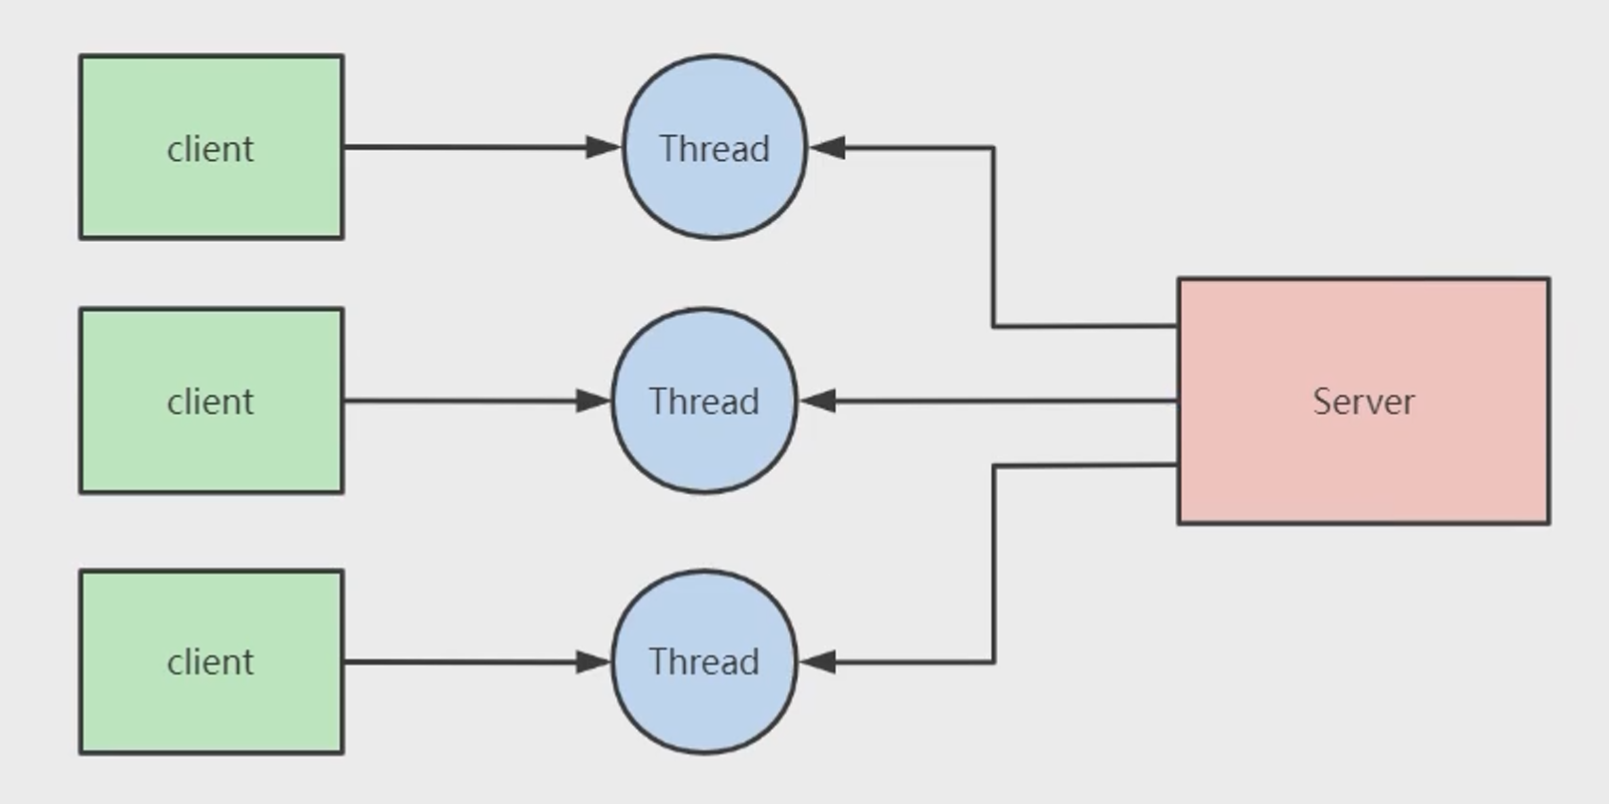
通过上面的测试 , 可以得知BIO机制是 阻塞等待 消息 , 可以看出不能多客户端连接 .
BIO不能同一时间处理大量连接的数据 , 即使多线程也招架不住百万用户(内存爆炸) , 因此不建议使用 . 因此BIO告一段落...
# NIO
NIO是Netty主流使用的通信方式 , 在简单应用中 NIO和BIO使用的方式相差不大 , 但它们的API不同
简单应用
通过 Java 运行的服务端 和 cmd telnet指令 通信
Java服务端代码
展开 SocketServer类
public class SocketServer {

    /**
     * 保存客户端连接
     */
    static List<SocketChannel> channelList=  new ArrayList<>();

    public static void main(String[] args) throws IOException {
        // 创建NIO (和BIO ServerSocket类似
        ServerSocketChannel serverSocket = ServerSocketChannel.open();
        // 让客户端绑定端口
        serverSocket.socket().bind(new InetSocketAddress(9099));
        // 设置 非阻塞
        serverSocket.configureBlocking(false);
        System.out.println("服务器 启动...");

        while (true) {
            // accept方法 不会阻塞(设置了false
            SocketChannel socketChannel = serverSocket.accept();
            // 未连接null 一致处于循环状态
            if (socketChannel != null) {
                System.out.println("连接成功");
                // 设置 SocketChannel 为非阻塞
                socketChannel.configureBlocking(false);
                // 保存客户端连接List
                channelList.add(socketChannel);
            }
            // 遍历连接 进行读取数据
            Iterator<SocketChannel> iterator = channelList.iterator();
            while (iterator.hasNext()) {
                SocketChannel next = iterator.next();
                // 字节缓存区
                ByteBuffer byteBuffer = ByteBuffer.allocate(6);
                // read方法 不会阻塞
                int len = next.read(byteBuffer);
                if (len > 0) {
                    System.out.println("收到消息: "+new String(byteBuffer.array()));
                }
                if (len == -1) {
                    iterator.remove();
                    System.out.println("客户端断开连接");
                }
            }

        }

    }
}
打开多个cmd 连接 , 支持一个信道多个连接
# 连接 本机:9099
telent localhost 9099
# 更改模式 Ctrl+]
send {内容}
# 关闭连接
quit
在简单应用方式中 NIO网络通信虽然解决了阻塞问题 , 但是如果大量用户连接 , 但真正通讯的只有那么几个 , 遍历的时 , 大多都是无效遍历 , 也就意味着会造成浪费内存 !
# 普通NIO通信问题解决方案
思路 : 用一个大型集合存储 channelList 和 小集合存 触发收发数据的 channel , 循环遍历 小集合处理
Selector类 监听通信事件 , 一旦有对象进行注册 , 监听器则会监听对象事件 , 客户 连接/发数据 , 都会触发事件 , 达到有事就干的目的
关键方法 :
| 返回 | 方法 | 说明 |
|---|---|---|
| Selector | static open() | 创建[epoll](#epoll 模型) |
| SelectionKey(通道与注册的键) | register(Selector sel, int ops) | 注册 ServerSocketChannel , 指定ops监听事件 |
| int(就绪操作集的键数) | select() | 等待阻塞 , 当监听到对象触发了事件 , 才会释放通行 |
Selector基于epoll实现 , 他们是通过Linux内核进行操作 , [点击了解 epoll](#epoll 模型)
事件分类 :
| 常量名 | 值(int) | 事件说明 |
|---|---|---|
Selectonkey.OPREAD | 1 << 0 | 读取操作 |
Selectonkey.OP_WRITE | 1 << 2 | 写操作 |
Selectonkey.OP_CONNECT | 1 << 3 | 连接操作 |
Selectonkey.OP_ACCEPT | 1 << 4 | 接收操作 |
提示
事实上事件都存到 Selector.channels属性 集合中 , 可通过 selectedKeys()方法 获取触发事件的集合

就绪事件列表 rdlist , 如果 channel 有事件发生了 , 会将数据放置 rdlist 就绪事件列表 , 而 epoll-wait 会监听 rdlist 列表
有些关键信息是涉及到 [epoll](#epoll 模型)
代码测试 :
客户端
展开 NioSelectorServer类
public class NioSelectorServer {

    public static void main(String[] args) throws IOException {

        // 创建NIO
        ServerSocketChannel serverSocketChannel = ServerSocketChannel.open();
        serverSocketChannel.socket().bind(new InetSocketAddress(9099));
        // serverSocketChannel 设置 非阻塞
        serverSocketChannel.configureBlocking(false);
        // 打开 Selector处理Channel, 即创建epoll
        Selector selector = Selector.open();
        // 把 ServerSocketChannel 注册到 selector 上 , 并且selector对客户端accept连接操作
        serverSocketChannel.register(selector, SelectionKey.OP_ACCEPT);
        System.out.println("服务端启动完成...");

        while (true) {
            // 阻塞等等待时间发生
            selector.select();

            // 获取 selector中注册的全部事件的 SelectionKey实例
            Set<SelectionKey> selectionKeys = selector.selectedKeys();
            Iterator<SelectionKey> iterator = selectionKeys.iterator();

            while (iterator.hasNext()) {
                SelectionKey key = iterator.next();
                // 如果是OP_ACCEPT事件 , 则进行 连接获取 和 事件注册
                if (key.isAcceptable()) {
                    ServerSocketChannel server = (ServerSocketChannel) key.channel();
                    SocketChannel socketChannel = server.accept();
                    socketChannel.configureBlocking(false);
                    // 这里只注册读事件 , 如果需要给客户端发送数据可以注册写事件
                    socketChannel.register(selector, SelectionKey.OP_READ);
                    System.out.println("客户端连接成功");
                }
                // 如果是OP_READ事件 , 则进行 读取和打印
                if (key.isReadable()) {
                    SocketChannel socketChannel = (SocketChannel) key.channel();
                    ByteBuffer byteBuffer = ByteBuffer.allocate(6);
                    int len = socketChannel.read(byteBuffer);
                    if (len > 0) {
                        System.out.println("收到消息: "+new String(byteBuffer.array()));
                    }else if (len == -1) {
                        iterator.remove();
                        System.out.println("客户端断开连接");
                    }
                }
                // 删除处理后的事件(以防下次复用)
                iterator.remove();
            }

        }

    }

}
模拟某一时间刻多用户发送消息的方式 , 我们观察 selectedKeys数量(事件数)
- 断点运行 服务端
- 启动一个telnet 并连接 , 观察断点注册过程 (selectedKeys: 1)
- 启动两个telnet 并连接 , 跳过断点注册事件过程
- 打断点发送消息 , 3个客户端各发送2条消息 (selectedKeys: 6)
- 最后 selectedKeys迭代遍历只执行了6次
笔记
通过以上测试模拟可以得知 , Selector对象 通过监听事件行事 , 不会干无用功(节省CPU) , 也节省了空间(节省内存) . 正好解决了前面的问题(无效循环)
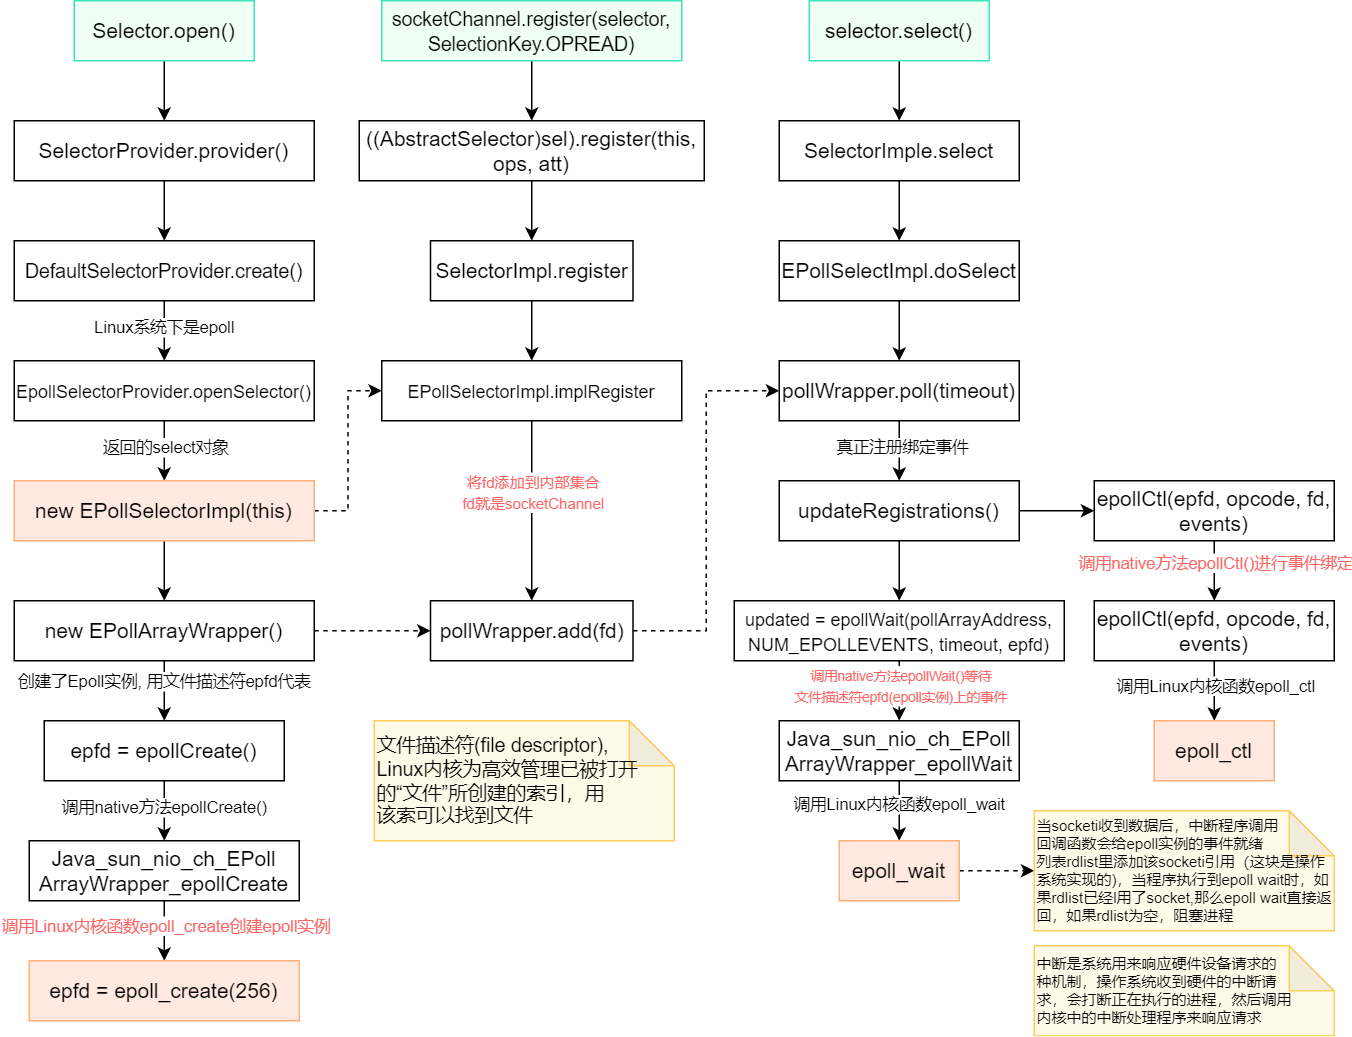
# epoll 模型
epoll 底层是通过C语言运行的 , 因此 需要 JavaAPI Selector类 进行操作 , 通过 Selector 直接控制 Linux内核操作
Selector类中的 关键方法 与 epoll底层 关键函数 相对应
| Selector | epoll |
|---|---|
| open() | epoll_create() |
| register() | epoll_ctl() |
| select() | epoll_wait() |
epoll底层中的 关键函数 :
epoll_create(): 实例化epoll_ctl(): (注册) 使用 文件扫描符 epfd 引用 epoll实例 , 对目标文件op操作epoll_wait(): (等事件) 等待 文件描述符 epfd事件
分别解刨他们的关键方法对应的Linux内核函数 (下图仅了解)
# Natty应用
上面 NIO 应用 , 显然没有发挥到极致 .
假设我们正在打大型游戏 , 与服务器通信 , 每次IO交互都会上万事件 . 很难现象仅靠一个循环解决这些事件并非是优化的解决方案 , 那么事件一旦多了就会卡(高ping战士) . 在通信框架的技术选型还是有必要注重下的! (哪怕是多线程也难以驾驭)
因此Netty对NIO处理做了大量优化 , 因此我们关注的操作 , 只需3步 :
- 初始化创建启动对象
new ServerBootstrap - 链式配置启动对象
- 启动Netty服务端
Netty内部操作
通过 Reactor 实现操作(响应式编程) , Reactor 类似于 Selector
思路 : (Neety优化大致思路)
mainReactor 专门负责连接 , 连接处理好交给 subReactor
subReactor 专门负责后端收发
提示
不难发现 , 在创建服务端对象的时候 , 要有两个线程池 , 是专门为以上两个Reactor处理使用的!
# 代码示例
大致步骤 :
- 引入依赖
- 创建启动对象
- 编写 事件处理类 , 并且在启动对象进行配置
- 启动服务器
- cmd telnet连接 测试
Netty依赖 (版本自选)
<!-- https://mvnrepository.com/artifact/io.netty/netty-all -->
<dependency>
    <groupId>io.netty</groupId>
    <artifactId>netty-all</artifactId>
    <version>4.1.87.Final</version>
</dependency>
服务器
展开 NettyServer类
public class NettyServer {

    public static void main(String[] args) {
        /**
         * 创建两个线程组bossGroup和workerGroup, 含有的子线程NioEventLoop的个数认为cpu核数的两倍
         * - boosGroup 处理连接请求 (mainReactor
         * - workerGroup 处理业务 (subReactor
         */
        EventLoopGroup boosGroup = new NioEventLoopGroup(1);
        EventLoopGroup workerGroup = new NioEventLoopGroup(10);

        try {
            // 创建 服务端启动对象
            ServerBootstrap bootstrap = new ServerBootstrap();
            // 链式配置参数
            bootstrap.group(boosGroup, workerGroup)
                    // 使用NioServerSocketChannel作为服务器通道实现
                    .channel(NioServerSocketChannel.class)
                    // 初始化服务器连接队列大小 , 服务器处理客户端连接请求顺序处理 , 所以 同一时间只能处理一个客户端连接
                    // 如多个客户端同时连接时 , 请求放置队列中等待处理
                    .option(ChannelOption.SO_BACKLOG, 1024)
                    // 设置处理器
                    .childHandler(new ChannelInitializer<SocketChannel>() {
                        @Override
                        protected void initChannel(SocketChannel socketChannel) throws Exception {
                            socketChannel.pipeline().addLast(new NettyServerHandler());
                        }
                    });
            System.out.println("netty server start...");
            // 绑定端口 , 生成 ChannelFuture异步对象 , 通过isDone()
            // 启动服务器bind() ; 异步操作sync()
            ChannelFuture cf = bootstrap.bind(9099).sync();

            // 等待服务器 socket 关闭 。
            // 在这个例子中,这不会发生,但你可以优雅地关闭你的服务器。
            cf.channel().closeFuture().sync();

        } catch (InterruptedException e) {
            throw new RuntimeException(e);
        }

    }

}
**服务端 事件处理 **
展开 NettyServerHandler类
/**
 * 自定义Handler 继承Netty 某个 HandlerAdapter(规范)
 *
 * 入站事件处理
 */
public class NettyServerHandler extends ChannelInboundHandlerAdapter {

    /**
     * 当客户端连接服务器触发方法
     * @param ctx
     * @throws Exception
     */
    @Override
    public void channelActive(ChannelHandlerContext ctx) throws Exception {
        System.out.println("客户端 通道 建立完成...");
    }

    /**
     * 读取客户端发送的数据
     * @param ctx
     * @param msg
     * @throws Exception
     */
    @Override
    public void channelRead(ChannelHandlerContext ctx, Object msg) throws Exception {
        // 类似NIO 的 ByteBuffer
        ByteBuf buf = (ByteBuf) msg;
        System.out.println("收到客户端消息: "+buf.toString(StandardCharsets.UTF_8));
    }
}
测试
- 启动 客户端
- cmd 执行 telent命令
- 随意发送消息
提示
以上代码可以作为模板应用 , 因 不管怎么用都是同一过程
# 聊天室
基于Netty简单实现聊天室 , 模拟 群聊功能 , 仅限在线通信
服务端
展开 ChatServer类
/**
 * 服务端 聊天室
 * 直接套用Netty模板
 */
public class ChatServer {

    public static void main(String[] args) {
        EventLoopGroup boosGroup = new NioEventLoopGroup(1);
        EventLoopGroup workerGroup = new NioEventLoopGroup(10);

        try {
            ServerBootstrap bootstrap = new ServerBootstrap();
            bootstrap.group(boosGroup, workerGroup)
                    .channel(NioServerSocketChannel.class)
                    .option(ChannelOption.SO_BACKLOG, 1024)
                    // 设置处理器
                    .childHandler(new ChannelInitializer<SocketChannel>() {
                        @Override
                        protected void initChannel(SocketChannel socketChannel) throws Exception {
                            // 加入 解码器
                            socketChannel.pipeline().addLast("decoder",new StringDecoder());
                            // 加入 编码器
                            socketChannel.pipeline().addLast("encoder",new StringEncoder());
                            socketChannel.pipeline().addLast(new ChatServerHandler());
                        }
                    });
            System.out.println("聊天室 server start...");
            ChannelFuture cf = bootstrap.bind(9099).sync();
            cf.channel().closeFuture().sync();
        } catch (InterruptedException e) {
            throw new RuntimeException(e);
        }
    }

}
客户端
展开 ChatClient类
/**
 * 聊天室 客户端
 */
public class ChatClient {

    public static void main(String[] args) {

        EventLoopGroup group = new NioEventLoopGroup();
        try {
            Bootstrap bootstrap = new Bootstrap();
            bootstrap.group(group)
                    .channel(NioSocketChannel.class)
                    .handler(new ChannelInitializer<Channel>() {
                        @Override
                        protected void initChannel(Channel channel) {
                            // 加入 解码器
                            channel.pipeline().addLast("decoder", new StringDecoder());
                            // 加入 编码器
                            channel.pipeline().addLast("encoder", new StringEncoder());
                            channel.pipeline().addLast(new ChatClientHandler());
                        }
                    });
            // 连接服务端
            ChannelFuture channelFuture = bootstrap.connect("127.0.0.1", 9099).sync();
            // 获取信道 channel
            Channel channel = channelFuture.channel();
            System.out.println("============" + channel.localAddress() + "============");
            // 扫描器 , 对接信息
            Scanner sc = new Scanner(System.in);
            while (sc.hasNextLine()) {
                String msg = sc.nextLine();
                // 发消息 (发到服务端), 往信道写数据并刷新
                channel.writeAndFlush(msg);
            }

        } catch (InterruptedException e) {
            throw new RuntimeException(e);
        }
    }

}
服务端事件处理
展开 ChatServerHandler类
public class ChatServerHandler extends SimpleChannelInboundHandler {

    private static ChannelGroup channelGroup = new DefaultChannelGroup(GlobalEventExecutor.INSTANCE);
    SimpleDateFormat sdf = new SimpleDateFormat("yyyy-MM-dd HH:mm:ss");

    /**
     * 就绪状态 , 提示上线
     * @param ctx
     * @throws Exception
     */
    @Override
    public void channelActive(ChannelHandlerContext ctx) throws Exception {
        Channel channel = ctx.channel();
        // 远端地址
        SocketAddress socketAddress = channel.remoteAddress();
        // 推送消息 (公告)
        // 该方法将 channelGroup中的所有的 channel遍历 , 并发送消息
        channelGroup.writeAndFlush("[客户端] " + socketAddress + " 上线了" + sdf.format(new Date()) + "\n");
        // 将当前客户端 channel 加入到 channelGroup (加入组)
        channelGroup.add(channel);
        System.out.println("上线 > "+socketAddress);
    }

    /**
     * 不活动状态 , 提示离线
     * @param ctx
     * @throws Exception
     */
    @Override
    public void channelInactive(ChannelHandlerContext ctx) throws Exception {
        Channel channel = ctx.channel();
        // 远端地址
        SocketAddress socketAddress = channel.remoteAddress();
        // 推送消息 (公告)
        // 该方法将 channelGroup中的所有的 channel遍历 , 并发送消息
        channelGroup.writeAndFlush("[客户端] " + socketAddress + " 下线了" + sdf.format(new Date()) + "\n");
        // 将当前客户端 channel 加入到 channelGroup (加入组)
        System.out.println("离线 > "+socketAddress);
        System.out.println("channelGroup Size: " + channelGroup.size());
    }

    /**
     * 读取消息
     * @param channelHandlerContext
     * @param o
     * @throws Exception
     */
    @Override
    protected void channelRead0(ChannelHandlerContext channelHandlerContext, Object o) throws Exception {
        // 获取当前 channel (发送者)
        Channel channel = channelHandlerContext.channel();
        String msg = o.toString().trim();
        channelGroup.forEach(ch -> {
            if (channel != ch) {
                ch.writeAndFlush("[客户端] " + channel.remoteAddress() + " 发送了消息: " + msg + "\n");
            } else {
                ch.writeAndFlush("[自己] 发送了消息: " + msg + "\n");
            }
        });
        System.out.println();
    }

    /**
     * 异常处理
     * @param ctx
     * @param cause
     * @throws Exception
     */
    @Override
    public void exceptionCaught(ChannelHandlerContext ctx, Throwable cause) throws Exception {
        // 关闭信道
        ctx.close();
    }
}
客户端事件处理
展开 ChatClientHandler类
public class ChatClientHandler extends SimpleChannelInboundHandler {

    @Override
    protected void channelRead0(ChannelHandlerContext channelHandlerContext, Object o) throws Exception {
        System.out.println(o.toString().trim());
    }
}
测试
- 启动 1个服务端
- 启动 3个客户端
- 观察 上线提示
- 3个客户端 分别发送些消息
- 观察 客户端是否均收到消息
- 离线 2个客户端
- 观察 离线数量
提示
聊天系统是不是很简单 , 有手就行 , 对吧 (才怪 , 刚接触我也是抄的 😋)
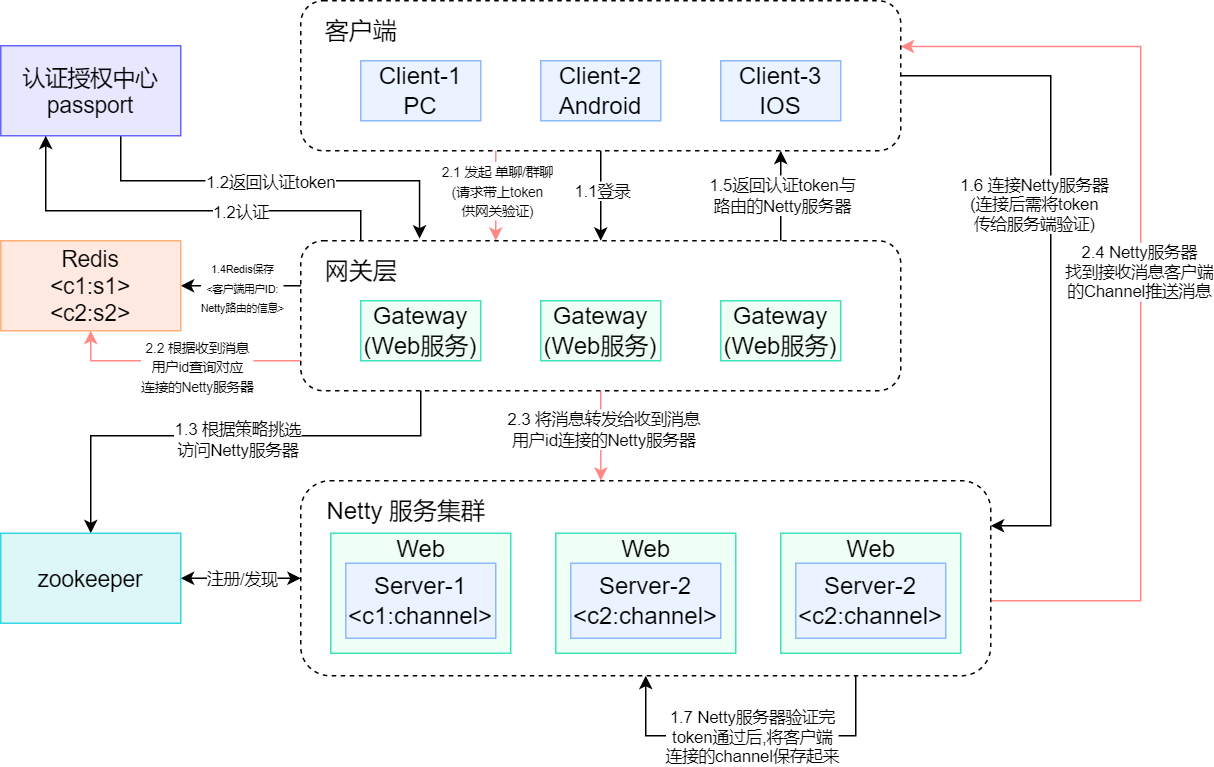
# 海量数据架构图
# 1.0版本
Q&A
Q : 如果Client-1 发消息给 Client-2 , 且他们不在同一Netty服务器上 , 如何进行通信?
A : 当Client-1发消息时 , 在网关层会判断Client-1和Client-2是否在同一Netty服务器 , 不在同一服务器会在Reids查 Client-2 所连接的Netty服务器 , 可在网关层进行转发到 Client-2 连接的Netty服务器 , 达到通信目的!
# 2.0版本
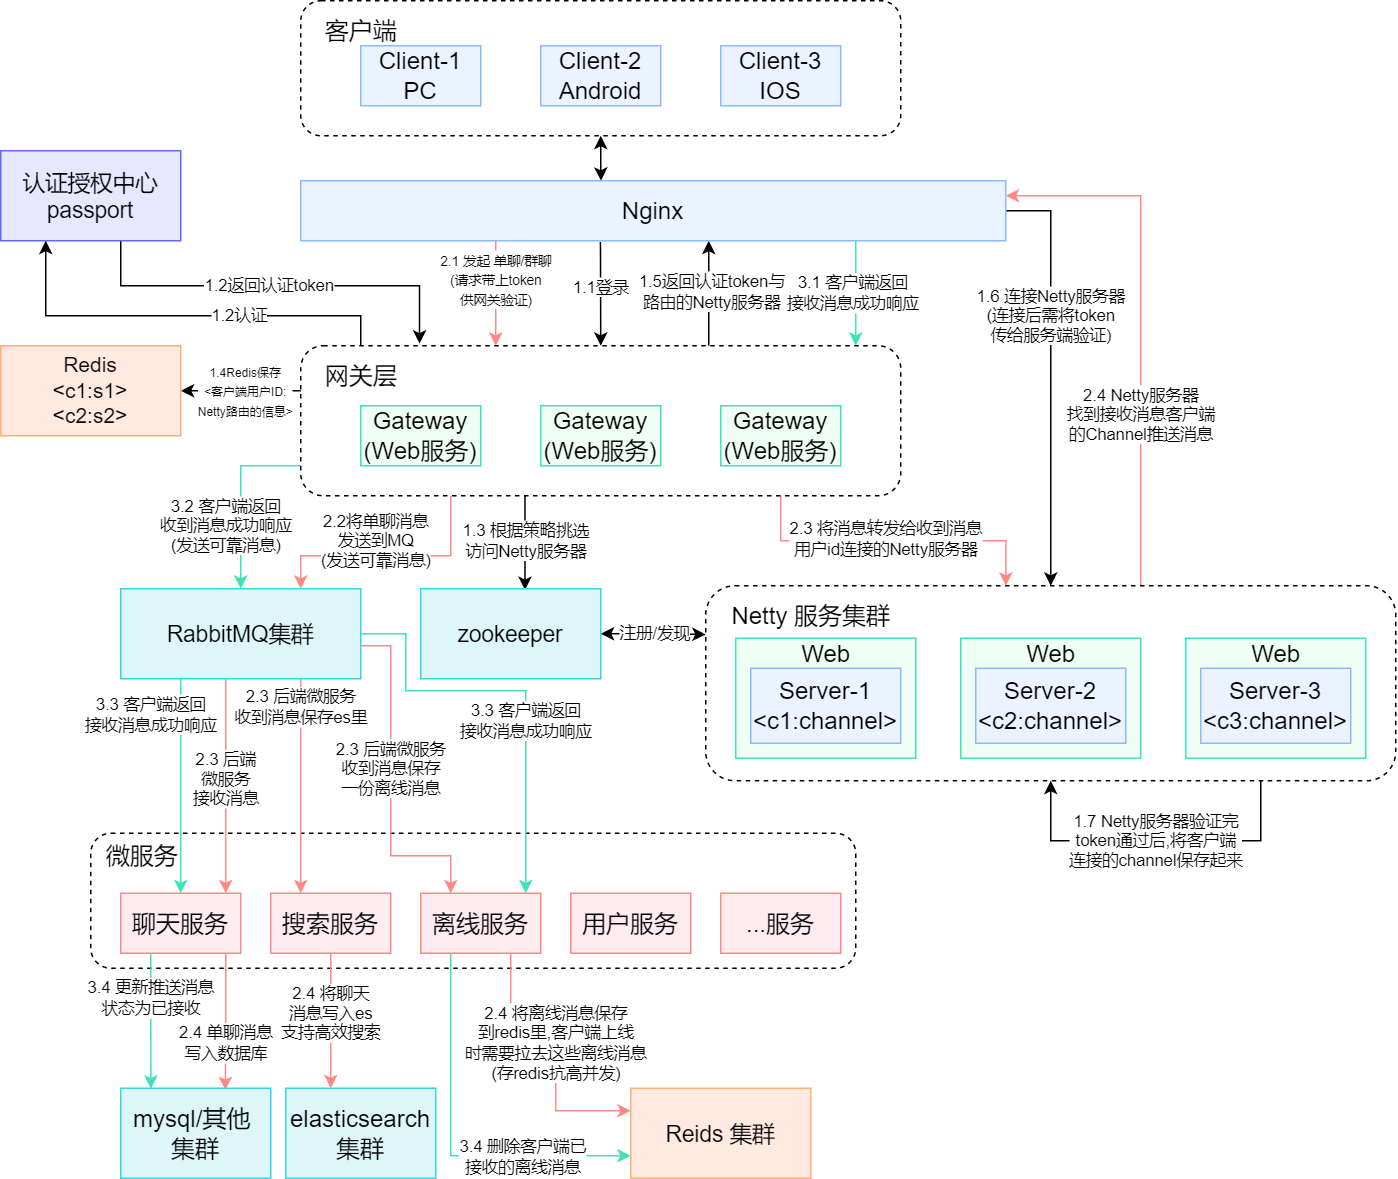
2.0 和 1.0 的区别 (距离大厂进了一大截)
- 数据库存储 消息
- RabbitMQ消息队列缓存消锋
- 微服务架构
- 支持离线发送
Q&A
Q : 如果Client-1 发消息给 Client-2 , 但Client-2不在线 , 如何进行推送到目的?
A : 当Client-1发消息后 , 在网关层判断Client-2是否存在 , 如果不在线会将信息缓存到Redis直到Reids上线拉去完成后 , 才会在缓存清除该消息 !
以上信息仅仅是了解 Netty网络通信 , 并非深入学习!